skoda Workshop Repair Guides

Skoda Workshop Service and Repair Manuals

Removing and installing as well as setting the brake light switch > < Checking/removing and installing parts of the ABS system on the rear axle (disc brake and drum brake) - front-wheel drive
Removing and installing parts of the ESP system
The description of the structure and function of the ESP can be found in self-study programme No. 28.
t  Remove and install yaw rate sender -G202- and lateral acceleration sender -G200- → Chapter
t  Remove and install steering angle sender -G85- → Chapter
Special tools and workshop equipment required
t  Vehicle system tester -V.A.G 1552-
t  Diagnostic cable -V.A.G 1551/3- or -V.A.G 1551/3A-
Remove and install yaw rate sender -G202- and lateral acceleration sender -G200-
The removal and installation procedure of the yaw rate sender -G202- and the lateral acceleration sender -G200- is the same except for the direct replacement of the sender to be removed.
  Note
t  Before disconnecting the battery determine the code of radio sets fitted with anti-theft coding.
t  After connecting the battery, perform the following:
–  on vehicles with radio encoding, carry out the coding,
–  set clock,
–  initialise power windows on vehicles fitted with power windows → BookletOctavia
Removing
–  Disconnect battery.
   
–  Remove the bottom part of the dash panel -1- → Body Work; Rep. gr.70.
–  Remove the bottom part of the steering column trim panel -2- → Body Work; Rep. gr.70.
  S45-0056
The yaw rate sender (-G202-) -1- and the lateral acceleration sender (-G200-) -2- are fixed with a common bracket -3- at the mounting bracket for the steering column -a-.
  Note
Due to the common bracket, the senders cannot be removed separately. After removing the bracket, the yaw rate sender -G202- and the lateral acceleration sender -G200- can be replaced separately.
–  Disconnect the plugs -arrows- from the yaw rate sender -G202- and from the lateral acceleration sender -G200-.
–  Unscrew screw -5- and remove bracket -3- with yaw rate sender -G202- and lateral acceleration sender -G200-.
Replace yaw rate sender -G202-
  S45-0057
–  Unscrew the nuts -a- from the yaw rate sender (-G202-) -1-.
–  Remove the yaw rate sender (-G202-) -1- from the bracket -3-.
-2- Lateral acceleration sender -G200-
–  Insert the new yaw rate sender (-G202-) -1- into the bracket -3- and align it straight.
–  Screw on nuts -a- and tighten.
Replace lateral acceleration sender -G200-
  S45-0058
–  Lever off the holder -2- from the lateral acceleration sender (-G200-) -1- using a screwdriver.
–  Remove the lateral acceleration sender (-G200-) -1- from the bracket -4-.
-3- Yaw rate sender -G202-
  S45-0059
–  Insert the new lateral acceleration sender (-G200-) -1- into the bracket -3-.
-4- Yaw rate sender -G202-
  Note
The inclined side -arrow- of the lateral acceleration sender (-G200-) -1- must point in the direction of the holder -2-.
–  Push the holder -2- over the lateral acceleration sender (-G200-) -1- and lock.
Install
  S45-0060
–  Mount the bracket -3- with the lateral acceleration sender (-G200-) -2- and the yaw rate sender (-G202-) -1- on the mounting bracket -4- for the steering column -a-.
–  Insert and tighten screw -5-.
–  Fit on plug for yaw rate sender (-G202-) -1- and plug for lateral acceleration sender (-G200-) -2- (arrows).
–  Install the bottom part of the steering column trim panel → Body Work; Rep. gr.70.
–  Install bottom part of dash panel → Body Work; Rep. gr.70.
–  Connect battery → Electrical System; Rep. gr.27.
–  Initiate basic setting → Chapter.
–  Interrogate the fault memory → Chapter.
–  Erasing fault memory → Chapter.
  S45-0057
Tightening torques:
Yaw rate sender (-G202-)9 Nm
Bracket at mounting bracket for steering column20 Nm

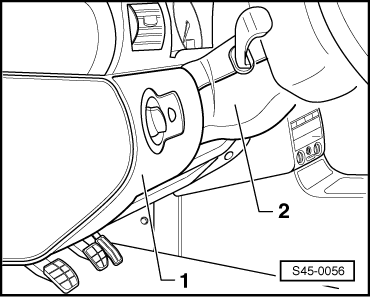
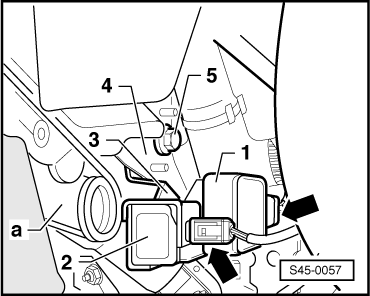
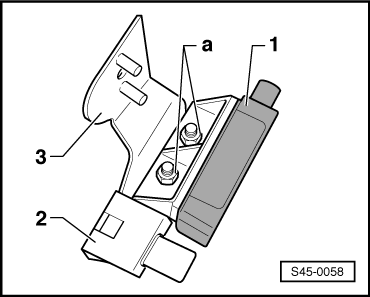
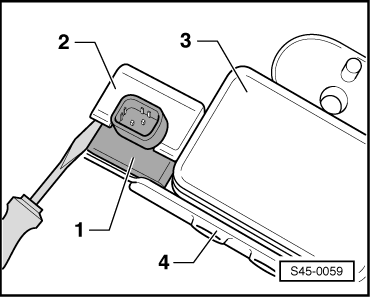
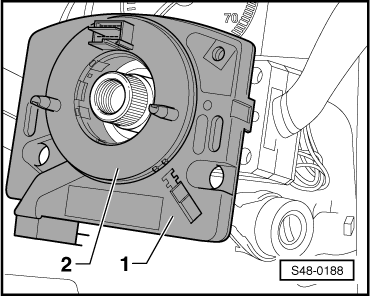
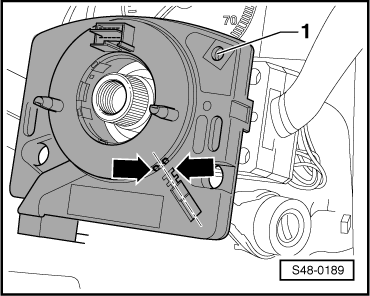
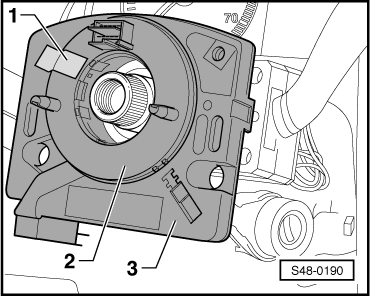
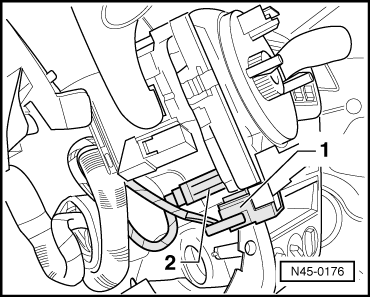
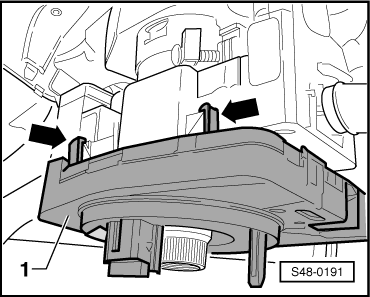
Removing and installing steering angle sender -G85-
Special tools and workshop equipment required
t  Vehicle system tester -V.A.G 1552-
t  Diagnostic cable -V.A.G 1551/3- or -V.A.G 1551/3A-
  Note
t  Before disconnecting the battery determine the code of radio sets fitted with anti-theft coding.
t  After connecting the battery, perform the following:
–  on vehicles with radio encoding, carry out the coding,
–  set clock,
–  initialise power windows on vehicles fitted with power windows → BookletOctavia.
Removing
–  Disconnect battery.
–  Put the front wheels in straight ahead position.
–  Remove steering wheel → Body Work; Rep. gr.69.
   
–  Unscrew screws -1-, -2-, -3- and -4-.
–  Remove the handle for the steering wheel adjuster as well as the top and bottom part of the steering column trim panel.
- Check whether the front wheels are in the straight-ahead position.
–  If necessary, fit on the steering wheel and put the front wheels in a straight ahead position.
–  Remove steering wheel.
  S48-0187
The steering angle sender -G85- is fitted together with the coil spring -2- in the housing -1-.
  Note
The following two work steps must only be performed when reinstalling at a later stage the same housing with a coil spring.
  S48-0188
–  Position the steering angle sender in the centre position:
A yellow dot must be visible in the window -1-.
The markings -arrows- must be flush.
Make sure this position is maintained.
  S48-0189
–  Secure the coil spring -2- against unintentional turning by covering it with adhesive tape -1-.
-3- Housing
  S48-0190
Disconnect plugs -1- and -2-
  N45-0176
–  Carefully release catch hooks -arrows- and remove housing -1- with steering angle sender -G85- and coil spring.
Install
–  Slide housing -1- with steering angle sender -G85- and coil spring onto the steering column and lock into position with steering column switch -arrows-.
–  Connect both plug connections.
  Note
After removing the transport protection or the adhesive tape do not turn the coil spring, only the positioning of the steering angle sender -G85- in centre position is allowed.
–  Removing transport protection or adhesive tape.
  S48-0191
–  Position the steering angle sender in the centre position:
A yellow dot must be visible in the window -1-.
Markings -arrows- must be flush with each other.
Make sure this correct position is maintained.
–  Remove the top and bottom part of the steering column trim panel as well as the handle for the steering wheel adjuster.
–  Install steering wheel → Body work; Rep. gr.69.
–  Connect battery → Electrical System; Rep. gr.27.
–  Perform the basic setting of the steering angle sender -G85- → Chapter.
–  Interrogate the fault memory → Chapter.
–  Erasing fault memory → Chapter.
  S48-0189

Removing and installing as well as setting the brake light switch > < Checking/removing and installing parts of the ABS system on the rear axle (disc brake and drum brake) - front-wheel drive