skoda Workshop Repair Guides

Skoda Workshop Service and Repair Manuals

Cylinder block - gearbox side > < Removing and installing bracket for auxiliary units
Removing and installing vibration damper
Special tools and workshop equipment required
t  Counterholder -T10355 -
Removing
–  Remove the sound dampening system → Body Work; Rep. Gr.50.
–  Remove the front right wheelhouse liner → Body Work; Rep. Gr.66.
   
Vehicles with auxiliary heating.
–  Slacken the clamp -1- and release the screw -2-.
–  Remove silencer for auxiliary heating.
Continued for all vehicles
–  Remove V-ribbed belt → Chapter.
  A10-10778
–  Screw out screws -arrows-.
–  Remove charge-air pipe. To do so lift terminals -1 and 2-.
  A21-10162
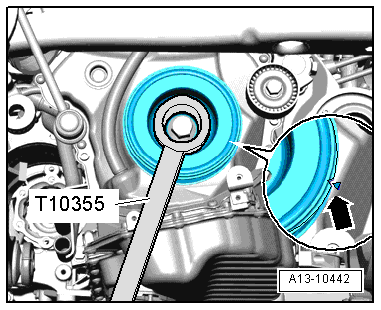
–  Turn the vibration damper with the counterholder -T10355- into position “TDC for cylinder 1”-arrow-.
l  
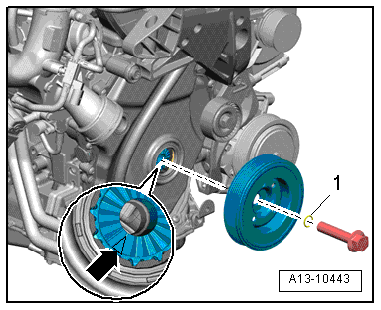
The notch at the vibration damper must be opposite the arrow marking on bottom cover for timing chain.
–  Release screw for vibration damper, to do so use counterholder -T10355-.
  Caution
Risk of damage to the engine.
In order not to adjust the timing, the crankshaft must not be turned from the “TDC” position on removed vibration damper.
Install
Installation is carried out in the reverse order. Pay attention to the following:
  Note
t  Replace screw for vibration damper.
  A13-10442
t  Replace O-ring -1-.
–  Remove oil residue on the crankshaft journal with a clean cloth.
–  Position vibration damper, while doing so observe tooth contour -arrow- and tighten screw.
   Tightening torque: → Chapter
–  Install the V-ribbed belt → Chapter.
  A13-10443

Cylinder block - gearbox side > < Removing and installing bracket for auxiliary units