
Roomster
| Disassembling and assembling the gearshift mechanism on the gearbox side (gearshift shaft cannot be removed from gearshift cover) |
 Note
Note| t | Grease bearing points and friction surfaces. |
| t | Assign the grease via the → Electronic Catalogue of Original Parts. |
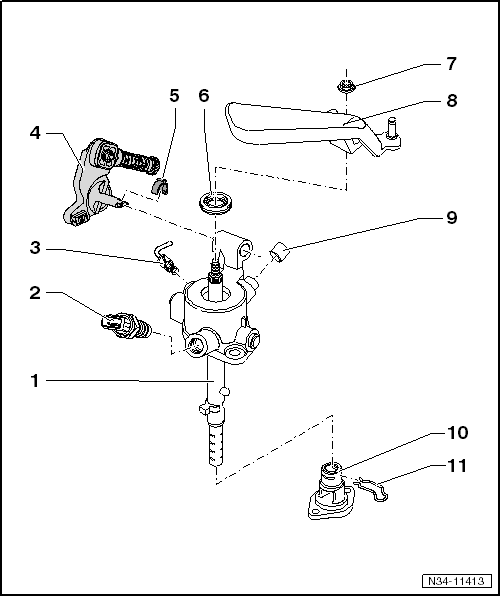
| 1 - | Gearshift unit |
| q | consisting of the gearshift shaft and the gearshift cover |
| q | Parts cannot be separated |
| 2 - | Reversing light switch -F4-, 20 Nm |
| q | Grease peg lightly with grease for plug serration of clutch disc -G 000 100- |
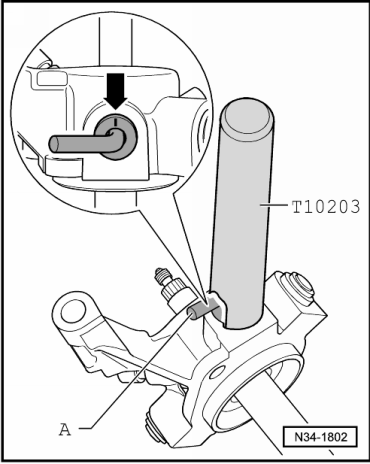
| 3 - | Locking angle |
| q | for setting the gearshift mechanism |
| q | removing → Fig. |
| q | installing → Fig. |
| 4 - | Reversing lever |
| q | Fitting position → Chapter |
| q | remove and install (Fabia II, Roomster) → Chapter, (Rapid) → Chapter |
| q | after fitting, set the shift mechanism (Fabia II, Roomster) → Chapter, (Rapid) → Chapter |
| 5 - | Clip |
| q | for relay lever with hole in the bearing shaft |
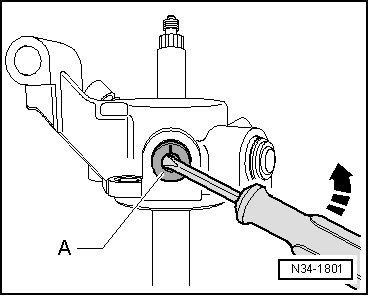
| 6 - | Gasket for gearshift shaft |
| q | release with a screwdriver |
| q | inserting → Fig. |
| 7 - | 20 Nm |
| q | always replace → Electronic Catalogue of Original Parts |
| 8 - | Gearshift lever |
| q | insert in such a way that the interrupted spacing of the teeth matches the gearshift shaft |
| q | may be replaced with the gearshift mechanism mounted |
| q | Fitting position → Chapter |
| q | after fitting, set the shift mechanism (Fabia II, Roomster) → Chapter, (Rapid) → Chapter |
| 9 - | Cap |
| q | for gearbox bleeder |
| 10 - | Screw cap |
| 11 - | Spring |
| q | if present, insert in the screw cap |
|
|
|
|